Building Web APIs Using Python & Flask.
Building Web APIs Using Python & Flask
- There is a huge surge in the number of Machine Learning based products which are being actively researched and developed across the globe.
- One of the crucial factors in the delivery of an ML product is the ability to expose the trained model/predictions to the world.
- In this article, I will provide a step-by-step guide for developing a web app using Flask.
A typical web application consists of -
- A Web Server that uses HTTP to serve files that are in turn translated into web pages for the end-users. Typical examples of web servers would be NGINX, Apache Tomcat, Lightspeed, etc.
- A Web Server Gateway Interface (WSGI) - WSGI is the bridge between a web server and a python framework/Application. A typical example of Python WSGI would be Gunicorn.
- Application Framework which provides a developer-friendly environment for developing web applications. Flask is the popular micro-framework which we shall explore in this article.
Without further ado, let's jump into the implementation details. Rest of the blog will cover the following topics -
- Training a basic model.
- Saving and Loading ML models using pickle.
- Server app using Flask.
- Using Postman for drawing Inference from the trained model.
import json
import os

import sklearn
import pandas as pd
import numpy as np
import pickle
from sklearn.model_selection import train_test_split
from sklearn import datasets
from sklearn.linear_model import LogisticRegressionCV
from sklearn.preprocessing import StandardScaler

from flask import Flask, request, jsonify

def warn(*args, **kwargs):
    pass
import warnings
warnings.warn = warn

from IPython.display import HTML
display(HTML('<style>.prompt{width: 0px; min-width: 0px; visibility: collapse}</style>'))
display(HTML("<style>.container { width:100% !important; }</style>"))
1. Model Training
To limit the scope of this article, we shall proceed by training a basic classifier for the famous IRIS dataset. The data set contains 3 classes of 50 instances each, where each class refers to a type of iris plant.
Attribute Information:
- sepal length in cm
- sepal width in cm
- petal length in cm
- petal width in cm
- class:
-- Iris Setosa
-- Iris Versicolour
-- Iris Virginica
Please note that we won't be focussing on aspects like model complexity, architecture and incremental improvement in training accuracy since it beyond the scope of this article.
## Loading data
iris_data =  datasets.load_iris()
X, Y = iris_data['data'], iris_data['target']
train_x, test_x, train_y, test_y = train_test_split(X, Y, test_size = 0.05)
print("training data has %d rows"%len(train_x))
print("test data has %d rows"%len(test_x))
## Normalizing data
std_scaler_model = StandardScaler()
normalized_train_x = std_scaler_model.fit_transform(train_x)
## Fitting a Machine Learning Model using Cross Validation
logistic_reg_model = LogisticRegressionCV(penalty = 'l2', multi_class='multinomial', max_iter = 1000,
                                       solver = 'lbfgs', verbose=1, scoring = 'accuracy')
logistic_reg_model.fit(normalized_train_x, train_y)
training_accuracy = logistic_reg_model.score(normalized_train_x, train_y)
print("Training accuracy using cross validation is %f"%(training_accuracy* 100))
normalized_test_x = std_scaler_model.transform(test_x)
test_accuracy = logistic_reg_model.score(normalized_test_x, test_y)
print("Test accuracy is %f"%(test_accuracy* 100))
Awesome !!!
So, we have managed to quickly train a model that has cross-validated training accuracy of 97% and a test accuracy of WHOPPING (melodrama alert !!) of 100%.
Next, let's save our trained models using pickle so that we can access them later in our flask application.
As an exercise, one can validate that loaded models have the same training accuracy.
## save models as pickle files -
with open(os.path.join('.', 'data', 'scaler_model.pkl'), 'wb') as f_scaler:
    pickle.dump(std_scaler_model, f_scaler)

with open(os.path.join('.', 'data', 'classifier_model.pkl'), 'wb') as f_model:
    pickle.dump(logistic_reg_model, f_model)
Flask Application -
Create a python script with the following content. To help us better understand the script, let's dissect the application using manageable code blocks. The entire flask application consists of 5 code blocks.
Codeblock 1 -
a. Create an instance of "Flask" class.
b. We shall pass 'name' as the first argument while creating an instance.
c. name is a special variable in python which evaluates the name of the current module. We need to pass this information so that Flask knows where to look for HTML templates, static files etc.
To learn more about "name" variable, refer this elabroate blog.
Codeblock 2 -
a. Before our app starts serving predictions for incoming data, we need load saved models.
b. This can be accomplished by leveraging the decorator "before_first_request". As the name suggests, the decorator will call a function that can be configured to load parameters that we will need while making predictions.
c. The function in this block simply loads the pickle models which we had saved earlier.
d. The model variables are defined as 'global' so that we can access them outside of the scope of this initialization function.
Codeblock 3 -
a. This is a standard python function that accepts an input, normalizes it and computes predicts using loaded models.
b. The operations are self-explanatory. Note that the predictions are converted to the list so that they can be returned in the response object.
Codeblock 4 -
a. The route() decorator tells Flask which URL should trigger our function.
b. Note that we shall be using the 'POST' method in this article.
c. The GET method differs from the POST method in the way parameters are passed.
d. The input parameters for our function using the GET method are passed through the URL where the parameters are passed a part of the body while using the POST method.
e. The POST method is more secure as compared to a GET method.
Codeblock 5 -
- In the last block, we will simply trigger the flask app if the module is executed in a standalone mode.
- Note that there are various parameters available including port, debug mode and use of multithread.
RUN THE SCRIPT -
And, that's it, our app is ready to go live. Go ahead and run the script !! This will host the service on your local machine.
In the last and final section, we shall test our application using postman!
## iris_server.py

import os
from flask import Flask, request, jsonify
import pickle
import numpy as np


### codeblock-1 starts - Defining a flask app
iris_app = Flask(__name__)
### codeblock-1 ends

### codeblock-2 starts - Loading models before first request
@iris_app.before_first_request
def load_model():

    global l_std_scaler_model
    global l_logistic_reg_model
    with open(os.path.join('.', 'data', 'scaler_model.pkl'), 'rb') as f_scaler:
        l_std_scaler_model = pickle.load(f_scaler)

    print("loaded scaler model successfully")
    with open(os.path.join('.', 'data', 'classifier_model.pkl'), 'rb') as f_model:
        l_logistic_reg_model = pickle.load(f_model)
    print("loaded classifier successfully")
### codeblock-2 ends

### codeblock-3 starts - computing predictions
def get_predictions(x):
    print("Trying to predict classes for input data")
    norm_x = l_std_scaler_model.transform(x)
    preds = l_logistic_reg_model.predict(norm_x)
    return preds.tolist()
### codeblock-3 ends

### codeblock-4 starts - endpoint for receiving and serving prediction requests
@iris_app.route('/irisprediction', methods = ['POST'])
def predict_iris():

    try:
        input_dict = request.get_json(force=True)
        input_data = input_dict['inputs']
        input_arr = np.array(input_data)
        predicted_data = get_predictions(input_arr)
        return jsonify({"iris_predictions": predicted_data, "status": "SUCCESS"})
    except Exception as e:
        print("error occured - %s"%e)
        return jsonify({"iris_prediction": None, "status": "FAILED"})
### codeblock-4 ends

### codeblock-5 starts
if __name__ == "__main__":
    iris_app.run(port= 5050, debug= True)
### codeblock-5 ends
## python iris_server.py
Using Flask Service for predictions -
Once you run the 'iris_server.py' script, you should some logs as follows-
- Serving Flask app "iris_server" (lazy loading)
- Environment: production WARNING: This is a development server. Do not use it in a production deployment. Use a production WSGI server instead.
- Debug mode: on
- Running on http://127.0.0.1:5050/ (Press CTRL+C to quit)
- Restarting with stat
- Debugger is active!
- Debugger PIN: 129-173-235
In this section, we shall use Postman to test our service for computing predictions. The data passed while testing will typically be the out-of-bag dataset. Hence, this will be the true test of our trained models.
Go ahead and fire up your postman !!
Note - If you don't have postman installed, I would encourage you to install it first through official website
STEP 1 -
Your postman screen would look something like this 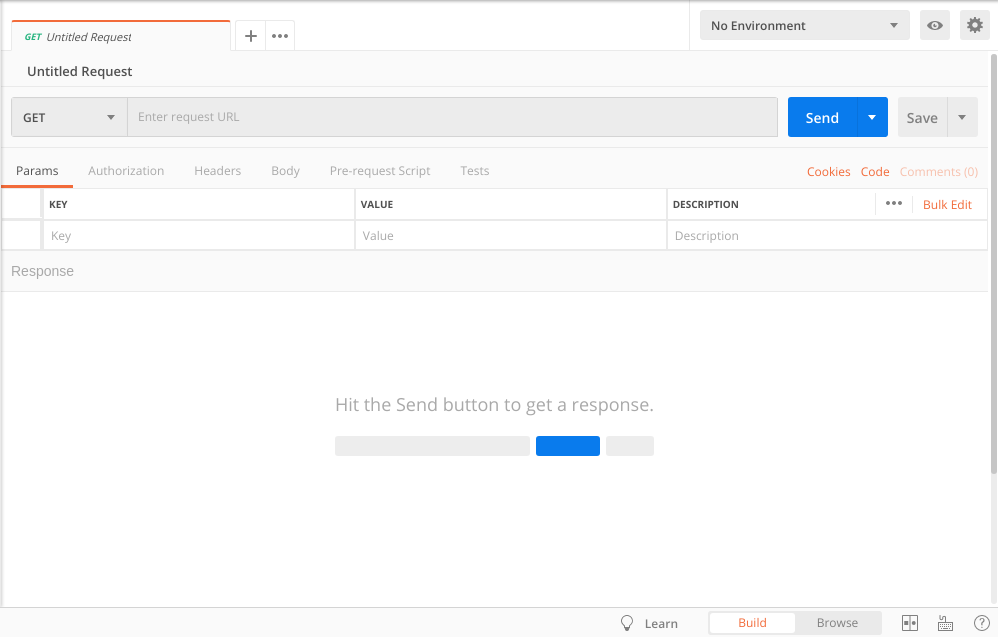 .
.
STEP 2-
Next, select the 'POST' method at the left corner and enter the url as shown in figure below - 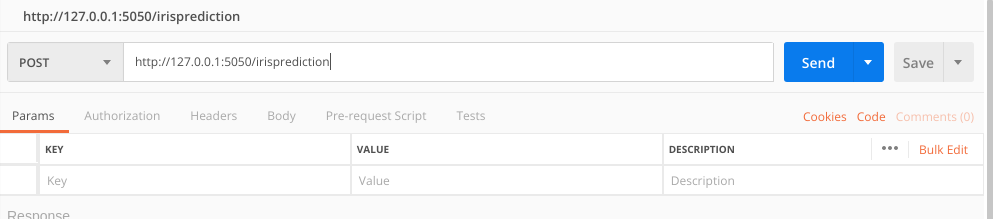
STEP 3 -
In order to pass data as json, select the 'Body'>'raw' tab as shown in figure. Under the drop down menu, select "JSON (application/json)".

STEP 4 -
Lastly, enter the data for which you wish to get predictions and hit SEND !!! 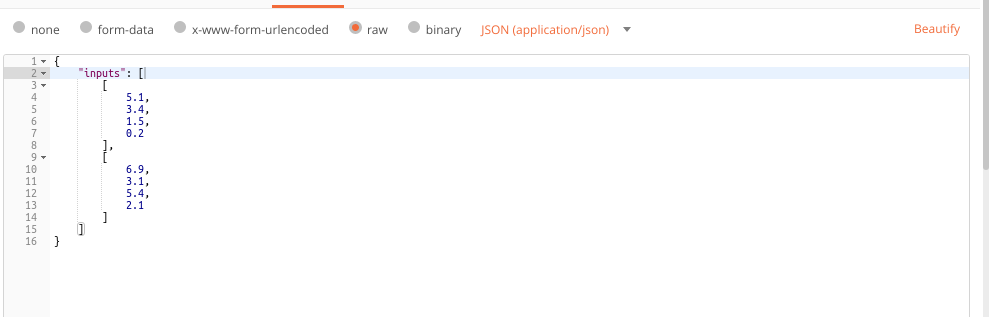
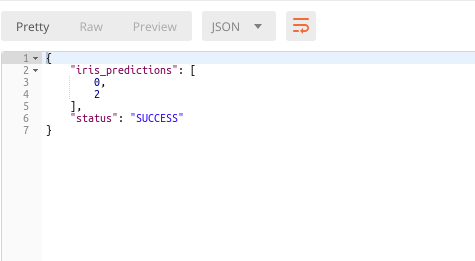
VOILA !! We have our predictions -
Final Comments -
- If you are concerned about the quality of predictions, the predictions are indeed correct which confirms that everything is working smoothly.
- As you may have noticed, this article only covers the third part of the Web Application pipeline. In the next tutorial, I will cover the WSGI aspect of Web App development using Gunicorn.